How To Make A Gallery Wall

Disclosure: This article may contain affiliate links, this means at no cost to you, we may earn a small commission if you purchase a product through them.
Gallery walls are a timeless decor choice that will never go out of style. They’re a lovely way to display a few art pieces or a collection of family photos in the lounge or nursery. Pulling together a gallery wall of your own together might seem daunting. Art can be pricey and curating personal photos can take a decent amount of time. Here’s how to do it.
Lay Out Your Gallery Wal Before You Hang It
Before you worry about what you’re going to put on your gallery wall, have a think about how. You don’t want to knock loads of holes in your wall and find you don’t like how it looks.
Measure the space that you want your gallery wall to fill. Using some tape to mark out a box of that size on your floor. Masking tape works well for this. Lay all of the pieces that you want to hang within your taped area. This way, you can play around with placement for as long as you like, moving things around, without making any holes in your walls. You can also make sure all of the pieces look good together before you commit.
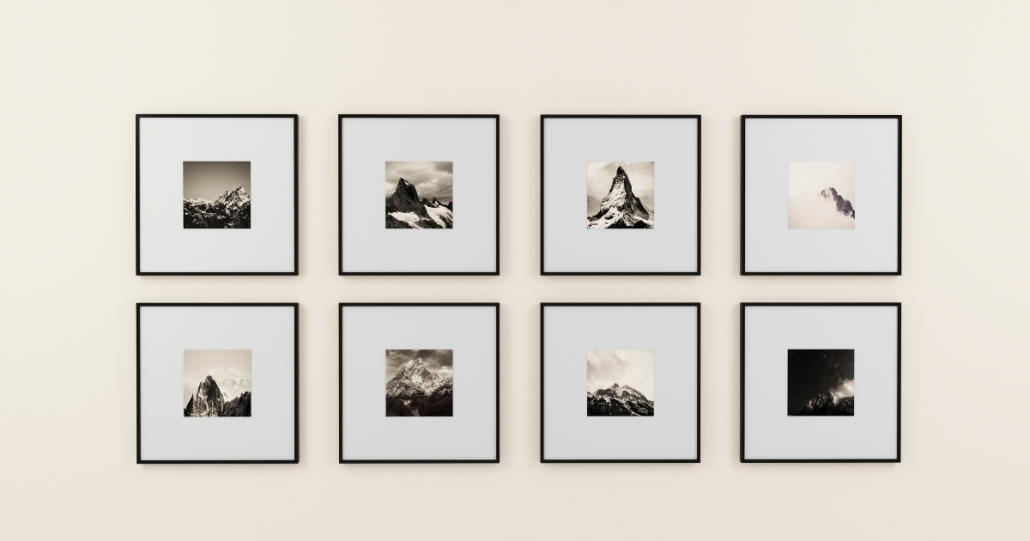
Create A Cohesive Color Palette For A Pulled Together Look
This isn’t a rule that you have to follow, and if you prefer your gallery wall to just keep things personal and fun, you can. However, if you would like your wall to look a bit more curated then sticking with a color palette can help. Try and keep the pieces that you choose in a similar tone, feeling, and intensity. For example, for a vintage look, choose a palette of neutrals, blues, and hints of gold. If you have a bigger range of pieces to try and make look good together, you could frame them the same to help them go well together. For example, choose all white frames for a cohesive finish.
Start With Something Large To Anchor The Whole Collection
To get your layout looking pleasing to the eyes. Start by placing your biggest pieces first, and build the rest of your layout around them. Place your biggest piece in one of the four outer corners of the space for a smaller collection, or just off-center but towards the middle, if you have a larger collection to hang. This larger piece will be the jumping-off point for placing all your other art. By hanging the biggest piece off-center, your eye will travel around the gallery wall, rather than being pulled straight to the middle of the gallery wall.
Try putting your second largest piece diagonally from your largest piece, whether that is right next to it or on the opposite side of the wall. Now all you need to do is just fill in the little bits of empty space between and around those anchor pieces.
A gallery wall doesn’t have to complicated with this method, and you can fill the space in a way that looks good.
My name is Louise and I am the Digital Marketing and Administrative Assistant at MyBump2Baby. I have been writing in the parenting niche for over 2 years specialising in fertility, pregnancy, baby and baby name support articles.